Friday, August 31, 2012

Free Permaculture Design Course Videos


Following is a link to free videos from a Permaculture Design Course taught by Bill Mollison, the co-founder of Permaculture. Thanks to my long lost friend Jake for sending me this link. The videos are from 1994 and 1995, so over 15 years later they are admittedly a bit dated (with a very corny intro), but the informational content is still high quality and valid... nature doesn't change. You can watch these online or download them and keep them on your computer. Highly recommend watching these if you get the chance.

http://www.networkearth.org/perma/culture.html#Permaculture

Thursday, August 30, 2012

Dehydrating Figs

My dried Figs... delicious!
  
I recently wrote about how our fig tree that is just pumping out the figs. I can fill up a plastic grocery bag with ripe figs every two or three days. That means a lot of figs. I have already shared my recipe for Pineapple, Port, & Fig Sauce. Today, I'll just share some photos of the dehydration process.
 
We have an Excaliber dehydrator, and I highly recommend it. This dehydrator is simple to use, easy to clean, comes in many sizes, and the company has great service and warranties, but it is not incredibly cheap. If you are not ready to buy a dehydrator, you can use your oven or even use your car (see this article on dehydrating in your car).
 
My biggest advice for food preservation, is to just get in there and try it. For more information on dehydrating, I recommend Dehydrate 2 Store, and as a great resource for dehydration tips and tools. She does use and promote the Excaliber, but she provides a goldmind of free information.
  
I started out with lots of figs and quickly washed then is some fresh water.
  
The figs were quartered and laid on the drying trays, dried for about 24 hrs, and that was it.
 

Wednesday, August 29, 2012

My New Sauerkraut

My new sauerkraut
I wish my good computer was working so I could color correct this photo. This kraut almost glows in the dark it is so bright pink, and the taste is fantastic!


I recently wrote about my first attempt at making sauerkraut. That sauerkraut was good, but the kraut I made next was really, really good. It was made with one head of green cabbage, one head of red cabbage, one apple, one tablespoon of caraway seeds, and about three tablespoons of salt. I let it ferment for about 5 days at room temperature, it gave a moderate amount of bubbling, and turned a brilliant, bright pink. The taste is amazing. Perfectly sour. Tart but not overpowering. Subtle sweetness and with a hint of caraway. I love it. If you like sauerkraut, then give this one a try.

Monday, August 27, 2012

Managing Pseudo-Primary Succession (a.k.a. “planting an empty field”)

Large scale reforestation in Brazil. We can do the same... just a little smaller.
 
I have been writing a lot lately about succession and its phases/stages and how we can use this knowledge to create more diverse and resilient ecosystems and Forest Gardens. If you remember, Primary Succession is the creation of an ecosystem from bare soil with no life in it. Secondary Succession is the regeneration of an ecosystem after a disturbance.

Now in reality, there is no place on earth that is devoid of life but for a very few places which we would not be living anyway. Every location likely had forest or meadow or prairie on it at some point in the past. Often what we find though is a place which one to two hundred years ago was a forest, but now is an abandoned corn or hayfield. The disturbance has been so large and repeated so often that we are almost starting from scratch in these locations. Trying to recreate a vibrant ecosystem, and in our case a food forest woodland, in this scenario is what I call pseudo-primary succession. The most extreme example of this that I have seen is what Geoff Lawton has done in Jordan and is well documented in his Greening the Desert video.

Many people have attempted to create a full forest garden in an abandoned farm field by planting all the fruit trees they wanted at one time. What they often end up with is a large die-off of these plants or lack of vigor in growth. It may take two or three times as long for these plantings to turn into a viable ecosystem than if they would have understood the power of succession. Many of the plants may be stunted or producing a fraction of what they have the potential to produce.

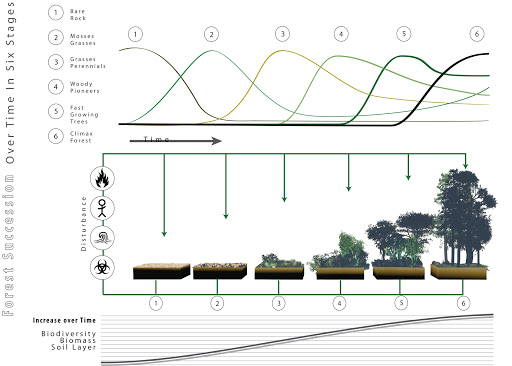
One of the big reasons that the plants do not do well in the above scenario is that they are competing with pioneer species. Pioneer species are plants, often considered weeds, which are just waiting to grow in newly turned soil. An abandoned field is full of these dormant seeds. In nature, pioneer plants are a vital part of succession. They cover the soil quickly and reduce erosion. They often have deep taproots that pull nutrients from the depths. They do well in droughty, full sun, bare soil conditions. As described previously in the stages of succession, the first plants are annuals and herbaceous perennials. Eventually shrubs and then trees appear. Pioneer species can be all of these types of plants, but the larger shrubs and trees often take many years to appear.

Let’s face it. Many of the plants we would want in a forest garden (apples, pears, peaches, etc.; a.k.a. “goal species”) are not known for their ability to withstand harsh environments of poor soil, high evaporation, and low moisture. So when we plant these somewhat weak species in a field that has limited natural fertility and is full of plants made for this environment, our weak plants are just not going to do very well. If they do well, it is because they happened to get placed in a very forgiving microclimate or because we have done a lot of work to provide for their exacting needs.

But I don’t want to do a lot of work if I can let nature do it for me.

This is where managing the pseudo-primary succession comes in to play. We can choose the pioneer species that grow on our land. Granted, there will always be other pioneer species that we did not plant or did not desire, but we will tip the balance in our favor by seeding and direct planting of our desired species.

So what makes a pioneer species desirable? Here is a partial list of attributes we are looking for in pioneer species:
 

ATTRIBUTES FOR PIONEER SPECIES
  • Grows Well in the Soil we Have – “poor” soils have different meanings around the world)
  • Grows Well with Moisture We Have – typically this is low to very low moisture
  • Fast Growing
  • Nitrogen Fixing – Having a high proportion of plants that put nitrogen back into the soil will enhance soil fertility; nitrogen fixing trees are strongly recommended
  • Produces High Levels of Biomass – leaves and branches that fall off every year which increase the organic components of the soil
  • Dynamic Accumulators – plants that put nutrients into their leaves, often mined from well below the soil surface through deep taproots, and then lose those leaves each year increasing the mineral content of the topsoil
  • Producer – if the plant can provide us a harvest, all the better!
  • Tolerates Frequent Pruning – we can build soil faster by chopping back leaves and spreading them around on the ground (a.k.a. “chop and drop”) when a plant can quickly regrow those leaves. Some plants can tolerate quite heavy prunings two or three times a growing season.
  • Intolerant of Shade – I’ll explain why this is important in just a bit

Once we have our bare land ready, and this may take some earthworks (pond creation, swale creation, etc.) which I have and will discuss in other articles, then we can plant our chosen pioneer species. As I said, pioneer species can range in form from annuals to trees. We can blanket the ground in seeds of annuals and herbaceous perennials to start, but we can fast forward the natural progression which can take over a decade, by directly planting pioneer shrubs and trees species as well.

Some people will give anywhere from one to three seasons for the pioneering woodland to mature. Others will just plant the goal species at the same time. I don’t think there has been enough research yet to know which method is better. I think giving things at least one season makes sense. This allows the barren site to begin resembling a small woodland (Oldfield Mosaic stage). Then the goal species are planted near the nitrogen fixing trees. Our goal species then have what is known as a nurse tree growing near it providing wind protection, excessive sun protection, evaporation protection, and excess nutrients primarily of nitrogen but also other nutrients from the other pioneer species near it.

Within a few more years, the goal species are growing vigorously alongside their nurse trees. Eventually, often only after two or three years, our goal species are getting crowded. This is when we cut back or cut down our nurse trees. These trees can be used for firewood, lumber, mulch, mushrooms, etc. Now the goal species has a sudden increase in light and below ground biomass (i.e. nutrient load), and there is often another surge of growth as our goal species become the new canopy layer in our woodland.

Some of the reseeding annuals, herbaceous perennials, and shrubs will continue growing in patches of sunlight, but all the other plants will eventually find themselves in shade. If we chose plants intolerant of shade, which was one of our goals, then they will die out. This leaves us room to plant other goal species of reseeding annuals, herbaceous perennials, and shrubs that thrive in the understory yet still provide us with direct or indirect uses. Direct use would be the harvest of fruit, vegetable, wood, fuel, cordage, medicinals, animal feeds, etc. Indirect use would be beneficial insect attractors, dynamic accumulators, mulch plants, windbreak plants, barrier plants, etc.

Using succession, or what I call managed pseudo-primary succession, will give us a more vibrant, diverse, and fertile ecosystem which is typically established much sooner than a forest garden planted without regard to succession.

I’ll be providing a list of Pioneer Species soon, so stay tuned.
 

Friday, August 24, 2012

Joel Salatin's Animals: Chickens, Turkeys, Cattle, Pigs, Water, and Manure


Here are some more great videos (four more!) of Joel Salatin. This time he is walking around his farm showing his animals. It is wonderful to hear how and why he raises the animals the way he does. Happy animals raised in a way that is healthy for them, for us, and for the land. Good stuff!

Joel Salatin's Chickens


Joel Salatin's Turkeys and Beef Cattle
 
 
Joel Salatin's Pigs
 
 
Water and Manure Management on Joel Salatin's Farm
 

Thursday, August 23, 2012

Using Succession in Permaculture

Martin Crawford, the UK's premier Forest Gardener in his own Forest Garden.
 
 
I recently wrote about succession in ecosystems. So, how do we apply that knowledge? This is a great place to utilize Permaculture Principle One: Observe and Interact. Now that we have a better understanding of succession, we can answer an important question when we are evaluating or “observing” a piece of land. What state of succession is this land in right now? Likely, our answer will be something like this: The section over here is in a Steady State (or close to it). The section over there is Oldfield Mosaic. This area that used to be a corn field is just entering Soil Initiation.

The “interact” portion of Permaculture Principle One has a bit more to it. It really depends on our goals. Most people would naturally think that our goal should be do develop and design for a Climax or Steady State. However, we now know that production peaks in mid-succession. When exactly this occurs is a lot more difficult to pin down, but it is typically somewhere from the Oldfield Mosaic stage to the Transition to early Climax stage. We also know that diversity increases with more disturbances. In a sense, we never want our land to arrive at the Climax stage, but we would rather it continuously cycle between disturbance and secondary succession.

It is those disturbances that we will create and manage to keep our ecosystem productive. We don’t do this with burning down our forest or bulldozing all the fruit trees, but we do it with pruning, culling, coppicing, and harvesting. We can also manage the secondary succession, give it direction, and help it on its way.

So how is this done? Let’s take a closer look at each of these methods.

Pruning – this is trimming a plant to accomplish a number of goals. It can be used to trim away diseased portions of the plant. It can be used to trim away dead or old non-productive branches. It can be used to open up space for a view or to cut back overgrowth on a trail or path. It can be used to allow more sunlight through the branches. It can be used to thin a tree to allow more wind to go through the plant than over and around it. It can be used to shorten the plant for easier harvest or to prevent it from growing over a roof or into electric lines. It can be used to train a plant to grow in a certain pattern or direction. The list can go on and on. Whatever the reason for our pruning, it allows more sun and rainfall through, and therefore changes the microclimate underneath. We can plant species that will grow well in this new microclimate or let the understory change on its own.

Culling – this is removing a plant for a number of reasons. We cull plants because they are too big, too small, too expansive, too much work, not productive enough, not a species or variety we like (appearance, fruit, etc.), if it was planted in the wrong place years ago, if it is casting too much shade, blocking too much wind, blocking a view, too disease or pest prone, etc. When we cull a plant, especially a large shrub or tree, we suddenly have a very large area underneath no exposed to sunlight, rainfall, evaporation, decreased shade, decreased leaf fall, etc. This is an opportunity for sun loving plants fill that void. We can let nature decide, but better yet (since this is typically a much larger space) we can immediately fill that gap with plants that would do well in that new microclimate. Fill it will plants that can benefit us and the ecosystem as a whole.

Coppicing – this is cutting trunk and branches from a tree to harvest the wood while not killing the plant. In a number of years, and this varies depending on species and climate, the plant can be harvested again. Read this article for a more in depth description. Coppicing lies between pruning and culling. It significantly opens up a large gap as culling does, but it does not leave that space open for other large shrubs or trees to take over. Plant species with shorter life spans can grow, mature, and produce a good harvest for a few years before the coppiced plant shades out the understory again. Blackberries and gooseberries are shrubs that can fill this niche, but many herbaceous perennials will as well. Herbs and even annual vegetable gardens can be even placed here for a few years. This will take advantage of the good soil that had been building up under the tree, and will give us reason to rotate our annual vegetable plot locations. We just need to keep in mind root depth, as the coppiced tree stump or “chair” is still there in the ground (so root crops like carrots may not be a great idea), and negative allelopathy, the ability for some plants (e.g. black walnut) to produce chemicals from their roots and fallen leaves that inhibit growth of other plants.

Harvesting – this is taking anything from the plant that we are going to use. Harvesting the fruit or leaves off a plant typically is not done in such a way as to change the microclimate around the plant. The type of harvesting that will change the microclimate is with coppicing or significant pruning (e.g. bamboo).

Managing Secondary Succession – As described above, anytime we create a new microclimate and have the opportunity to sow seeds or place new plants in that location, we are, in effect, managing secondary succession. We could let nature do this on its own, but we will likely end up with plants that are considered “weeds”. What this really means is that plants for which we don’t have a significant use have filled a place we would rather grow other species. So let’s beat those less than desirable plants to the punch. If we completely fill that new location with beneficial plants and seeds that are well suited for that microclimate, then our plants will typically out-compete those other plants. If we do this over and over again with any disturbance that occurs, whether planned or unplanned, then we will eventually have a very diverse, very resilient ecosystem that is chock full of plants for which we have direct or indirect use. Direct use would be the harvest of fruit, vegetable, wood, fuel, cordage, medicinals, animal feeds, etc. Indirect use would be beneficial insect attractors, dynamic accumulators, mulch plants, windbreak plants, barrier plants, etc.

So, in closing, this is a general overview of utilizing the concepts of succession in an established woodlot or forest garden. I’ll be writing soon about how to apply succession in the development of an empty field.
 

Wednesday, August 22, 2012

Joel Salatin on Local Food


Joel Salatin, pioneering farmer of sustainable agriculture and icon of the local food movement in the United States, is one of my most inspirational mentors... who I've never met. Here he is in another interview discussing sustainable agriculture and local food. Brilliant, as always.

Tuesday, August 21, 2012

What is Succession?

Forest Garden Succession
(click on the image to enlarge)


In ecology, as well as in Permaculture, there is a concept known as succession. This is the idea that an ecosystem will transition through stages of growth and maturation. To look at it simply, an empty field will first grow weeds and grasses then shrubs and small fast growing trees then more mature, longer-lived trees until a forest is formed. The individual species and final result will vary depending on where in the world this occurs with its macroclimate and microclimates taken into account.

How do we define the basic steps in succession starting from a piece of bare, lifeless ground to a self-sustaining forest? There are a number of ways to categorize and describe it; following is the system I prefer:
  1. Bare soil – No life here at all
  2. Soil Initiation – Bacteria then Algae begin to grow and spread
  3. Crust – Lichens, Mosses
  4. Oldfield – Annual herbs and grasses, then Herbaceous perennials
  5. Oldfield Mosaic – Shrubs begin to grow, then Sun-loving trees
  6. Stand Initiation – Maturation of Sun-loving trees
  7. Understory Repression – the previous herbs, grasses, herbaceous perennials, and shrubs that cannot tolerate shade will die back
  8. Stand Differentiation – as faster lived trees die back, the slower growing trees fill in the gaps to complete the canopy layer
  9. Understory Reinitiation – this really occurs with Stand Differentiation, and is when shade tolerant plants (sub-canopy trees, shrubs, herbs, etc.) establish under the canopy layer
  10. Climax – this is the stable, self-replicating, self-sustaining ecosystem

Of course, since this is nature, there are a number of problems with any simplistic generalizations. First, there really is no place that naturally occurs where there is Bare Soil and no life. Man has created a few of these places, way too many, in fact, but they are very uncommon. Second, at the other end of our succession scale we find Climax. Unfortunately, in nature we rarely find a place that is in true Climax either.

Third, succession is not linear. What we really see in nature is a piece of land in various stages of succession. There may be a large forest somewhere close to a Climax stage when a storm blows down a massive tree. The sudden opening of the canopy, which lets in a lot more light, causes that one section to revert many years or decades, maybe to the Oldfield stage. Forest fires, floods, drought, pests, disease, and man-made interventions like logging, mining, etc. can all cause a disturbance in the natural progression of linear succession. What we actually see in nature is a constant cycling back around through these stages. This is known as a Shifting Mosaic.

In the Shifting Mosaic theory there are a few phases:
  1. Primary Succession – described above
  2. Disturbance – described above
  3. Reorganization – the ecosystem reestablishes control of the energy flows of nutrients, sunlight, water, etc.
  4. Aggradation Stage – this is just a fancy way of saying the “building up” stage; has also been called Secondary Succession
  5. Transition – this is where the ecosystem is maturing, but is not yet at the Climax stage
  6. Steady State – this is another way of describing the Climax stage

Again, this does not perfectly describe what happens in nature. Ecosystems will cycle through the disturbance, reorganization, aggradation, transition phases only to be hit with another disturbance before a steady state has been reached. This will happen over and over again. Also, the idea of a stead state is also not static or stable. There are always shiftings of species diversity and plant density and small disturbances with isolated reorganization and aggradation here and there. I love David Jacke’s phrase for this: Cycles of Succession and Wobbling Stability.

It is important to keep in mind that this non-linear journey of succession actually leads to a more diverse ecosystem in the long run. There are more opportunities for new plant species to grow and develop a niche.

So there you have it. A quick primer on ecosystem succession. I'll be writing soon on how to apply this to Permaculture design.
  

Monday, August 20, 2012

Making Sauerkraut

 Sauerkraut just waiting to be made!

I have to be honest. When I was a kid, sauerkraut was one of the most disgusting things I ever could imagine eating. My dad would eat it on occasion, but I could barely stand the sight of it let alone the smell. Now I was a fairly picky eater. This was partially my own fault, but it was partially how we ate as a family. We ate pretty healthy foods, but we did not eat a wide variety of foods. If my mom would have brought in a bunch of new foods, the chances of us eating them would have been awfully slim.

Fast forward a few decades and I eat everything. I started trying new foods on a regular basis after I started living on my own and started cooking for myself. Now there is not really any food or drink that I will not eat. Well, I take that back. Goat head stew. That is one meal I will never eat... again. I did eat it once, and that was enough. So other than goat head stew, I will eat anything.

I decided to try sauerkraut again a few years ago when I was in Germany. I thought that if anyone could make sauerkraut the right way, if there was any chance that I would overcome my sauerkraut aversion, than it would have to be in Germany. Sauerkraut was offered in every restaurant and deli that I entered. With so many people eating sauerkraut so often, I needed to see what I had been missing. As it turns out, I was missing a lot. There are hundreds of varieties of sauerkraut, all with that characteristic and wonderful sour, tangy flavor which turns out to be the product of lactic acid fermentation.

After getting settled here in the Azores, I finally got up the nerve to try my hand at making sauerkraut. I ferment beer and apple cider, why not cabbage?

As it so happens, making sauerkraut is extremely simple. All you really need is some cabbage and some salt. That's it. I made mine slightly more complicated by adding carrots and onion. The photo at the top shows everything I used.

So here it is. This is the method I used:
  1. Chop cabbage up into 1/8-1/4 inch ribbons (like you are making cole slaw).
  2. Chop the onions the same way - I chopped my even thinner
  3. Shred the carrots
  4. Sprinkle on some salt - roughly 3 tablespoons is what I used for 2 heads of cabbage
  5. Put everything into a large bowl
  6. Mash it all up with your hands... I mean really grab some handfuls and squeeze the juice out of it, literally. Just crush it as much as you can over and over and over, mixing everything up as you go.
  7. Eventually, you will be accumulating fluid at the bottom of the bowl, this is the goal, this is your natural "brine"
  8. Put the cabbage mixture and brine into a crock or large mouth jar.
  9. Press the cabbage down firmly and repeatedly until the brine covers the mix.
  10. Place a smaller plate or lid on top of the cabbage to keep it covered.
  11. Place a weight of some sort (jar of water, ziplock bag of water, clean rock, etc.) on top of the plate. This keeps the cabbage all submerged under the brine.
  12. Taste it every few days. You'll need to repack the sauerkraut everytime you take out a sample, but this takes less than a minute.

The first few days, this sauerkraut was not great. It wasn't bad, but it tasted more like a soggy coleslaw. Then within about a week, the fermentation really got going. There was a layer of frothy bubbles pouring out from the sides of the plate I was using to keep the cabbage submerged. Underneath was a tangy, crunchy, pretty darn good sauerkraut. I am really excited to see how this matures over the next few weeks to months.

Thursday, August 16, 2012

Permaculture Plants: Alder

Alders can be large trees or medium-sized shrubs.


Common Name: Alder
Scientific Name: Alnus species
Family: Betulaceae (the Birch family)

Common Species:
  • Italian Alder (Alnus cordata) – Medium, standard tree
  • Black/Common Alder (Alnus glutinosa) – Large, standard tree
  • Gray/Thinleaf Alder (Alnus incana) – Large, standard tree
  • Seaside Alder (Alnus maritime) – Medium, standard tree
  • Red Alder (Alnus rubra) – Large, standard tree
  • Speckled Alder (Alnus incana subspecies rugosa) – Very large, multi-stemmed shrub
  • Smooth/Hazel Alder (Alnus serrulata) – Large, multi-stemmed shrub
Red Alder buds and leaves.

 
Description:
Alders are very fast growing large shrubs to tall trees found throughout the Northern Hemisphere. One of the few trees that put nitrogen back into the soil, these plants have many other uses including windbreaks, hedges, firewood, timber, pollen and nectar source for beneficial insects, erosion control, habitat restoration, and traditional medicine to name but a few. Definitely a plant worth considering if you have the room.


Alnus glutinosa

History:
There are 30 species of flowering trees and shrubs that are native to the northern Temperate Climates of the Earth. They are mainly pioneer species that have been used as windbreaks and hedges as well as for wood. Most native cultures have medicinal uses for different parts of the plant as well. However, there has been very little development of these plants.

Trivia:
Alder’s flowers are born in cylindrical clusters called catkins.

USING THIS PLANT
Primary Uses:
  • Ornamental tree or large shrub
  • Nitrogen Fixer – puts nitrogen back into the soil which may be used as a fertilizer to other plants (actinorhizal)
  • Windbreak or hedge (some species are great in maritime climates: Black, Italian, Gray, Seaside Alders)
  • Wood – Firewood, Timber, Furniture, Paper, Mushroom Production

Secondary Uses:
  • General insect (especially bees) nectar and pollen plant
  • Coppice plant (harvest every 12-25 yrs for kindling, firewood, tool handles, crafts, poles, fence posts, charcoal, and in any situation where the wood needs to be repeatedly exposed to water)
  • Plants with a shrub form can provide shelter for wildlife
  • Living Trellis – the lower branches can be pruned to allow fruiting vine species a place to grow. The fruiting plant typically then gets a natural boost of nitrogen from the Alder trellis.
  • Erosion Control - can be used to protect soil from erosion on steep banks
  • Fantastic pioneer species – a plant used to re-establish woodlands on former farmlands or eroded/difficult sites (fixes nitrogen, grows fast, produces lots of leaf litter for soil building, and dies back as other trees shade it out)
  • Biomass Production – since Alnus grows so fast
  • Dye from bark, shoots, catkins (mainly from Black Alder)
  • Tanning – leaves contain high amounts of tannin
  • Edible Catkins - raw or cooked, used as an emergency food source (Red Alder)
  • Edible Sap – can be used straight or concentrated to a syrup (Red Alder)
  • Traditional medicinal uses (primarily bark)

When young most Alders have horizontal patterns to the bark.

But as it ages, it gets more thick and fissured.

DESIGNING WITH THIS PLANT
USDA Hardiness Zone: See below
AHS Heat Zone: See below (not all species have reliable Heat Zone information)
  • Italian Alder (Alnus cordata) – USDA Hardiness Zone 6-9; AHS Heat Zone 9-6
  • Black/Common Alder (Alnus glutinosa) – USDA Hardiness Zone 3-7; AHS Heat Zone 3-7
  • Gray/Thinleaf Alder (Alnus incana) – USDA Hardiness Zone 2-6; AHS Heat Zone 6-1
  • Seaside Alder (Alnus maritime) – USDA Hardiness Zone 7
  • Red Alder (Alnus rubra) – USDA Hardiness Zone 4-7; AHS Heat Zone7-1
  • Speckled Alder (Alnus incana subspecies rugosa) – USDA Hardiness Zone 2-6
  • Smooth/Hazel Alder (Alnus serrulata) – USDA Hardiness Zone 5-8
Chill Requirement: No reliable information available, but as this is not a fruit plant, a chill requirement is not that important.

Plant Type: Medium to Large Tree, Medium to Large Shrub depending on the species
Leaf Type: Deciduous
Forest Garden Use: Canopy Layer, Shrub Layer
Cultivars/Varieties: Many species but very little development

Pollination: By wind. Flowers are monoecious (individual flowers are either male or female, but both can be found on the same plant).
Flowering: Spring, except for Seaside Alder which blooms in the Autumn

Life Span:
Years of Useful Life: Red Alder (Alnus rubra) can live to 100 years. Black/Common Alder (Alnus glutinosa) can live to 150 years


Alder poles being used as both a windbreak and a trellis for peas.

PHYSICAL CHARACTERISTICS OF THIS PLANT
Size:
  • Italian Alder (Alnus cordata) – 30-50 feet (9-15 meters) tall and 20-35 (6-10 meters) feet wide
  • Black/Common Alder (Alnus glutinosa) – 60-80 feet (18-25 meters) tall and 20-35 feet (6-10 meters) wide
  • Gray/Thinleaf Alder (Alnus incana) – 40-60 feet (12-18 meters) tall and 25-40 feet (7-12 meters) wide
  • Seaside Alder (Alnus maritime) – 20-30 feet (6-9 meters) tall and wide
  • Red Alder (Alnus rubra) – 40-60 feet (12-18 meters) tall and 25-40 feet (7-12 meters) wide
  • Speckled Alder (Alnus rugosa) – 20-35 feet (6-11 meters) tall and wide
  • Smooth Alder (Alnus serrulata) – 12-20 feet (3.5-6 meters) tall and wide
Roots: Fibrous (Smooth Alder (Alnus serrulata) has suckering roots)
Growth Rate: Fast to Very Fast
Oyster mushrooms growing on a downed Alder log.
Alder can also be innoculated with mushroom spawn to farm your own mushrooms.

GROWING CONDITIONS FOR THIS PLANT
Light: Prefers full sun to light shade
Shade: Tolerates light shade
Moisture: Trees can handle dry soils, but all Alnus species can grow in wet soils
pH: most species prefer fairly neutral soil (5.5-7.5)

Special Considerations for Growing:
Relatively disease and pest free.

Propagation:
Primarily from seed. Hardwood cuttings in Autumn.

Maintenance:
None

Concerns:
None

Wednesday, August 15, 2012

Earth Illuminated... an amazing video!


This video compilation of time-lapse photography from the International Space Station is truly amazing. It is great to watch something that restores the wonder of our natural world.


Tuesday, August 14, 2012

How a Community Fed Itself. Another look at Todmorden

Vegetable beds in front of the Police Station in Todmorden, UK.


Not too long ago, I shared this article about Todmorden, a town growing all its own vegetables. Apparently, I was not the only one who thought this was a revolutionary idea. The TED Conference organization who promotes "ideas worth sharing" hosted Pam Warhurst, the motivating person behind this UK town's gardening revolution. I highly recommend taking the 13 minutes to watch this video. This truly is an idea worth sharing.


Monday, August 13, 2012

Pineapple, Port, & Fig Sauce

The figs from my garden.

As my harvest of figs is reaching a peak, and I am able to pick from six to ten fresh figs per day, I am really able to experiment and create new recipes for fresh figs. Here is the latest one with two thumbs up from the wife.

Pineapple, Port, & Fig Sauce
A savory sweet sauce to be used over meats.

10 Fresh Figs, skin trimmed away (see note below for variety)
1 Cup Chopped Pineapple (fresh is best, but an 8 oz can with liquid will work)
1 Cup Ruby Port
1/2 Cup Red Wine Vinegar
1/2 Cup Rice Wine Vinegar
1/2 Cup Honey
1 Small Red Onion, chopped
1/2 Cup Chicken Broth or Stock (homemade is best, but use what you have)
2 Tablespoons Olive Oil
2 Tablespoons fresh Cilantro, chopped
Salt
Pepper
Optional - Hot Sauce (use as much as you like, but don't overpower it)
  1. Heat olive oil in pan and sautee onions until just beginning to brown.
  2. Add chicken stock and simmer until liquid is reduced by half.
  3. Pour into bowl and set aside.
  4. Add port and vinegars to pan and bring to a boil.
  5. Continue boiling until liquid is reduced by half; this will take about 10 minutes.
  6. Add the figs, pineapples, and honey.
  7. Simmer until the liquid has reduced a bit and fruit is cooked through.
  8. Add the reserved chicken stock and onions (and hot sauce if you want).
  9. Simmer until the liquid has reduced and the sauce has thickened to the consistency you want.
  10. When cooled to room temperature, add the chopped cilantro.
Just a fraction of the varieties of figs... pleasantly overwhelming!


NOTE: There are so many fig species and varieties out there. It really doesn't matter what kind you use. I have no idea of the kind of fig growing in my garden. All I know is it tastes really good. Fresh figs are vastly different than the more commonly available dried figs. Fresh figs have a tropical flavor, kind of a mix between peaches and strawberries... at least mine do. Some figs have a deeper, more rich flavor; it seems the dark or purple figs are like this. Others are lighter, more tropical. It just depends. Experimenting is fun!


Wednesday, August 8, 2012

111 Plants for Your Garden


This is a fun and quick article I found at Organic Authority.com. It is a list of "must have" plants for any kitchen garden. Just about every plant I could think would be mandatory for a list like this is already on it, so I think they did a pretty good job. Take a look. What do you think?

111 Plants for Your Garden

Tuesday, August 7, 2012

Seed Banks

A tiny fraction of the seeds stored in a professional seed bank

No, this is not a building that has replaced dollars with seeds.

A Seed Bank is a location or collection of seeds that are saved as a reserve (stockpile) just in case other seeds and/or plants have been destroyed. There are a number of reasons that individuals and organizations are keeping seed banks, but the most common reasons are the loss of biodiversity or food crops secondary to natural disasters, disease outbreaks, economic collapse, wars, or man-made habitat destruction.
One popular brand of individual seed bank.

Individual Seed Banks
For the individual, there are a number of companies that sell pre-packaged seed banks, and they are sold as “emergency seed banks”, “survival seed kits”, etc. In general, these are a slightly more expensive way to always have some seeds on hand if you ever think you would need them. The big problem that I have with these products is that it often gives a person a false sense of security. Way too many people have bought one of these containers and stored it in the basement, and have never grown a tomato plant in their lives. There are too many “survivalists” that are out there, trying to make sure they are prepared for the end of the world, who have a lot of gear but no skills to use them.

While I was never a Boy Scout, I try to live my life according to the Boy Scout motto, “Be Prepared.” To me, having a large selection of seeds, and the skills to use them to produce food, is what I am constantly striving for. Most years my garden is much smaller than I want it to be, but I am still able to produce food from it. My long-term goal is to be raising a large percentage of my family’s food. I know that will take practice and trial and error. So that is what I am working on now.

If you have the skills to grow your own food, and you have some extra cash, one of these kits may be a nice “just in case” item to have in your larder. Personally, I just have a large box filled with seed packs that I routinely use and replenish as needed. There is a growing section of my own stored seeds that will make my collection even more resilient.

Underground and inside the Kew Millennium Seed Bank

Professional Seed Banks
Now we get in to the large and very large seed banking projects. These seed banks are trying to save as many seeds as possible for all the reasons listed above, and they are doing an amazing job. The largest seed bank in the world is the Millennium Seed Bank Project. It is coordinated by the Kew Royal Botanical Gardens and is situated in West Sussex County, England. They currently have seeds from over 30,000 different species of plants. This represents over 10% of the world’s wild plant species. Astounding!

Their goal is to have 25% by the year 2020, and I think they could probably achieve this. They also perform germination tests on all species every 10 years. This is vital. If the seeds are no longer viable, then storing them is worthless. If the seeds have low rates, they can restock with fresh seeds (if they can). All the seeds are cleaned, packaged, labeled, and stored in below-freezing temperatures in the below ground, nuclear bomb-proof vault. These guys take seed storing seriously.

You can find more about the Millennium Seed Bank Project, adopt a seed, adopt a species, and even tour the facility by visiting their website here.

Monday, August 6, 2012

Permaculture Plants: Wisteria

Wisteria can be a stunning addition to your garden.

Common Name: Wisteria
Scientific Name: Wisteria species
Family: Fabaceae (the Legume, Pea, or Bean family)

Common Species:
Japanese Wisteria (Wisteria floribunda) – often with a Concord grape-like scent
American Wisteria (Wisteria frutescens) – typically not very fragrant
Kentucky Wisteria (Wisteria macrostachya) – typically not very fragrant
Chinese Wisteria (Wisteria sinensis) – most fragrant, often a Concord grape-like scent
Silky Wisteria (Wisteria venusta) – largest flowers, fragrant

Wonderful Wisteria privacy screen.

Description:
This beautiful, large woody vine is famous for its large, and sometimes fragrant, racemes (pendulous cluster of flowers) in purples, pinks, and white. However, this fast growing vine also puts nitrogen back into the soil and attracts many beneficial insects to the garden. A standout for the Forest Garden.

History:
There are 10 species of Wisteria that are native to eastern North America and Asia (China, Korea, and Japan), but because of its showy flowers, it has been introduced all over the world.


Trivia:
  • The world’s largest Wisteria vine is in California, planted in 1894, and measures more than 1 acre (0.40 ha) in size!
  • Chinese Wisteria (Wisteria sinensis) flowers were cured with sugr and mixed with flower to make a delicacy called “Teng Lo” – I have yet to find the recipe for this

Wisteria's abundant flowers attract bees and other beneficial insects.

USING THIS PLANT
Primary Uses:
  • Ornamental
  • Edible Parts: There are many reports that the entire plant contains a toxic substance (a glycoside); however, there are only a few reports in the medical literature (http://www.ncbi.nlm.nih.gov/pubmed/8433406). There are also many reports of traditional cultures, especially in Asia, that eat many parts of this plant. It is quite likely that heat destroys this toxic compound. Here is a great article on Wisteria from Green Dean of Eat the Weeds (http://www.eattheweeds.com/wisteria-criteria-2/). Until I find more reliable information one way or the other, I’m not going to be eating a lot of Wisteria, but I am dying to try some Wisteria Fritters… I’ll let you know when I do.
  • Flowers -  washed and boiled or battered and fried into fritters.
  • Seeds - cooked or baked. Baked Japanese Wisteria seeds are said to have a taste similar to chestnuts.
  • Leaves – young, tender leaves are cooked and eaten, and may be used as a tea substitute.


Secondary Uses:
  • Nitrogen Fixer – puts nitrogen back into the soil which may be used as a fertilizer to other plants.
  • General insect (especially bees) nectar plant
  • Lacewings prefer to lay eggs on this plant
  • Parasitic Wasps prefer to live around this plant
  • Thickets can create habitat for small birds and mammals and other wildlife
  • Can grow seasonally along structures (fences, arbors, pergolas, etc.) which would be great at blocking or directing wind, providing Summer shade, or seasonal privacy screens
  • Fiber from the plant has been used to make paper, thread, and cloth.


Yield: No reliable information
Harvesting: October - December.
Storage: Best used fresh or dried

DESIGNING WITH THIS PLANT
USDA Hardiness Zone: 4-9
AHS Heat Zone: No reliable information available
Chill Requirement: Likely considering the Hardiness Zone and the flowering nature of this plant, but there is not reliable information available.

Plant Type: Large woody vine with seasonal herbaceous growth
Leaf Type: Deciduous
Forest Garden Use: Vertical/Climbing Layer
Cultivars/Varieties: Many species and varieties available

Pollination: Self-Pollinating/Self-Fertile
Flowering: Summer. May-July. Flowers on when mature which may take only a few years with Kentucky Wisteria (Wisteria macrostachya), but can take up to twenty years with Chinese Wisteria (Wisteria sinensis)


Life Span:
Years to Begin Flowering: 1-2 years, especially with plants propagated through cuttings, but can take 20+ years for plants propagated from seed
Years of Useful Life: Easily dozens of years. Many documented vines are over one hundred years old.

Wisteria vines can be large, strong, and aggressive - plan well.

PHYSICAL CHARACTERISTICS OF THIS PLANT
Size: 20-50 feet (6-15 meters) tall and wide – depends on the species/variety
Roots: Strong, extensive root system, can be heart-shaped
Growth Rate: Fast

GROWING CONDITIONS FOR THIS PLANT
Light: Prefers full to partial shade
Shade: Tolerates light to medium shade
Moisture: Prefers medium wet soils, Kentucky Wisteria (Wisteria macrostachya) can tolerate wet soils
pH: most species prefer fairly neutral soil (5.5-7.5)


Special Considerations for Growing:
  • Avoid fertilizing Wisteria with nitrogen – this plant can produce its own nitrogen, so excess will inhibit flower production.
  • Choose the location for planting carefully. The strong roots can destroy walls and pavement if planted too close.
 
Propagation: Hardwood cuttings. Softwood cuttings. By seed, but plants grown from seed may take decades to bloom.


Maintenance:
Depending on the location and the amount of room you have, some pruning may be required to keep the vine in bounds.

Concerns:
  • Can spread quickly to a large size. Consider this when choosing a planting location and when determining how much seasonal pruning you desire to do.
  • Roots can be vigorous and expansive in some species.
  • Poisonous (see comments above)