Showing posts with label Beer. Show all posts

Tuesday, February 26, 2013

Book Review: The Brewmaster's Table


I am not a food snob; I am a foodie. I am not a beer snob; I am a beer connoisseur. Food and beer snobs will turn down food that doesn't meet their preconceived ideas of quality, which is often only what they read in an expensive magazine. A foodie will eat just about anything once, and the same is true of a beer connoisseur. However, we foodies and beer connoisseurs still truly appreciate quality food and drink. We just don't care if it made the cover of Food and Wine.

It is with this mindset that I review this book. The Brewmaster's Table by Garrett Oliver (the brewmaster of the Brooklyn Brewery), is an absolute must read for anyone who appreciates good food and beer. It provides a great history and explanation of all the world's major styles of beer, which to be honest, has been done before in many other books. But what makes this book unique, and why I use this book as a reference quite frequently, is that Garret Oliver provides recommendations for pairing food with each of the styles of beer he describes. He dives into the reasoning behind food and beer pairing so that we can understand why the beer goes so well with a particular food or style of food.

Any book that makes me want to go out and experiment with whatever the author is writing about is a success. This book has inspired me to experiment well over a dozen times already, and I think a lot more experimenting is in store.

One specific subject that this books addresses, and an area I have struggled with for some time, is what beverage to serve with Indian and other Asian meals. Wine is a poor fit, although I have had some success with champagne. I try to avoid soft drinks in all circumstances. Water works well, but is boring. Beer is what is left over, but as it turns out, stands out as a clear front runner. No drink, other than certain styles of beer, come anywhere close to matching the flavor profiles or offering a distinct but complimentary contrast of flavors to these foods. For these precious recommendations alone the book was worthwhile.

Fortunately, the book offers way more than just that. As it turns out, almost every food and style of cooking has an almost perfect pairing (or two or three) with a style of beer (or two or three). I am a wine drinker as well, and I really enjoy wine, but when it comes to matching food with drink, wine has nothing on beer. Sure, a classic American-Italian dinner has a great pairing in almost any table red wine. A juicy ribeye pairs great with a Syrah or Cab. But you can also drink beer with these meals as well. But what about everything else? What about a barbeque with hamburgers and hotdogs and spicy ribs? What about fish and chips. What about all the other foods people eat that just don't really work with wine? This book has the answer. Don't believe me? Read this book. Experiment for yourself, and you will see.

This book is yet another highly recommended read.

Monday, December 10, 2012

More Reasons to Drink Beer

During the holiday season, I will be doing quite a bit of traveling. I am also going to slow down and spend time with my family. I'll be posting a few things here and there. They will likely be interesting or fun photos or easy to watch videos, but I will not be writing in-depth or time-consuming research articles for a few weeks. So relax and enjoy the holidays. Have a Merry Christmas and a Happy New Year!

Thursday, November 15, 2012

What I am Brewing: Azorean Blackberry Porter

A previous Porter I brewed. One of my favorite styles of beer!
 
Name: Azorean Blackberry Porter
 
Comments:

My goal with this beer was to make a dark, dessert style beer for the Winter months. It is bubbling along right now, the blackberries slowly giving up their flavor and aroma (I hope!) into the dark brown Porter. Should be perfect for a cold night on the island sitting in front of the fireplace listening to the wind howl and the waves crash outside.
 
Azorean Blackberries (Rubus hochstetterorum) from my backyard garden wall.
 
Ingredients:
  • 6 lbs - Midwest Liquid Malt Extract Dark
  • 3.3 lbs - Midwest Liquid Malt Extract Gold
  • 1/2 lb - Grains: Caramel 120
  • 1/4 lb - Grains: Chocolate Malt
  • 1/4 lb - Grains: Black Malt
  • 1.5 oz - Hops: Tettnanger, US (AA 6.1%), boiling hops
  • 1.0 oz - Hops: Willamette (AA 6.4%), finishing hops
  • 3 lbs - Azorean Blackberries (previously frozen - picked from my garden)
  • Yeast - Safale S-04
     
     
Method:
  • Simmer crushed grains in 5 gallons of water at 155 degrees F for 30 minutes.
  • Remove grains from water
  • Add more water to bring total to 5 gallons (some water lost in heating/steeping time)
  • Bring to boil.
  • Add malt extracts and return to boil
  • Add boiling hops for 60 minutes
  • Add finishing hops at T-2 minutes
  • Transfer hot wort to 6.5 gallon brewing bucket containing thawed blackberries (the wort was just below boiling, so the blackberries were sterilized but not boiled)
  • Add yeast when completely cool (below 75 degrees F)
  • Rack off the fruit at 7 days
  • Allowed to settle for a day or two in a 5 gallon carboy - If the fermentation is still moving along, I may keep it in here for a while longer
  • Rack, prime with 3/4 cup corn sugar, bottle, age, drink!

Notes:
  • I would loved to have used more blackberries, but that was all I had. The blackberry season is over here, so I will need to wait until next year for more berries... local ones at least. Ideally, I would have at least double that amount. Hopefully I didn't destroy all the flavor with the hot wort. Hopefully I won't lose the small amount of berry essence to the fermentation gasses, krause, or trub. No worries though!
  • Depending on the taste of this beer, in the future I may consider adding the fruit to the secondary instead. The alcohol and pH at that point will likely inhibit any wild yeasts and bacteria, so I may be a better flavor infusion from the blackberries. This experimenting is why homebrewing is so fun!

Sunday, October 21, 2012

What I am Brewing: Holiday Brew

My cooling wort just waiting for some yeast

Name: Holiday Brew #1


Comments:
 
My goal with this beer was to make a lightly spiced, dark ale for the holidays. As we are in the second half of October already, this beer should be ready just in time for Thanksgiving. I'm hoping there will still be some left by Christmas!

Cinnamon stick, fresh ginger (needs chopping), whole nutmeg (needs grinding), and specialty grains (needs crushing)

Amarillo Hops (left), Vanguard Hops (right), and spices ready to go

Ingredients:
  • 3 lbs - Muntons Dried Plain Dark Malt
  • 3 lbs - Muntons Dried Plain Aber Malt
  • 2 lbs - Muntons Dried Plain Light Malt
  • 1/2 lb - Grains: Crystal 50/60
  • 1/2 lb - Grains: Caramel 120
  • 1 Cinnamon Stick - whole
  • 1 Teaspoon Nutmeg - freshly ground
  • 1 Teaspoon Ginger - freshly chopped
  • 3 Cloves - whole
  • 1.0 oz - Hops: Vanguard (AA 4.8%), boiling hops
  • 1.0 oz - Hops: Amarillo (AA 7.1%), finishing hops
  • Yeast - Safale S-04


Method:
  • Simmer crushed grains in 3 gallons of water at 155 degrees F for 30 minutes.
  • Rinse grains with 1 gallon water - drained right into the brew kettle
  • Add more water to bring total to 5 gallons
  • Bring to boil.
  • Add malt extracts and return to boil
  • Add boiling hops for 60 minutes
  • Add spices at T-10 minutes
  • Add finishing hops at T-2 minutes
  • Cool and transfer to clean 5 gallon carboy
  • Add yeast when completely cool (below 75 degrees F)
  • Ferment, rack, prime with 3/4 cup corn sugar, bottle, age, drink!


Monday, July 23, 2012

What I am Brewing: Dark Ale #6

My dark ale, just before the yeast was pitched (added).

Temporary Name: Dark Ale #6
Finished Name: Still debating...


Comments:
My initial goals in designing this beer was to first, use only ingredients I had already, and second, to try and make a really dark Irish Red Ale. Beer Advocate descibes Irish Red Ales as: A bit sweet, with a lightly hopped tea-like flavor, and an even dextrinous body, Irish Red Ales are easy to please. Look for well-rounded and blanced flavors, and a pleasant toasted malt character in many examples. A drying finish is common.

Unfortunately, I think I made this one too dark. You can see in the photo how this is much more of a dark brown ale. When cleaning up my equipment after brewing, there is a red tint to everything, but I think I used too much of the Roasted Barley. We will see how this progresses.

Ingredients:
  • 4 lbs - Muntons Dried Plain Light Malt
  • 1 lb - Muntons Dried Plain Dark Malt
  • 1 lb - Grains: Simpson's Dark Crystal
  • 1/2 lb - Grains: Simpson's Roasted Barley
  • 1/4 lb - Grains: Weyermann Cara Red
  • 1.0 oz - Hops: First Gold Pellets (AA 8.0%), boiling hops
  • 1.0 oz - Hops: Willamette Pellets, (AA 4.8%), finishing hops
  • Yeast - Wyeast Irish Red Ale Yeast

Method:
  • Simmer crushed grains in 2 gallons of water at 150-160 degrees F for 30 minutes.
  • Remove grains.
  • Bring to boil.
  • Add malt extracts and boiling hops, and return to boil.
  • Boil for 60 minutes.
  • Add finishing hops for last 1 minute of boil.
  • Strain into 5 gallon carboy with 2 gallons of cold water.
  • Top off for total of 5 gallons.
  • Add yeast when cool (below 75 degrees F).
  • Ferment, rack, prime with 3/4 cup corn sugar, bottle, age, drink!

Friday, May 11, 2012

Brewing TV

My friend Jake has once again pointed me to a goldmine of information. This time it is a great website, BrewingTV.  I absolutely love this site. Great information. Fun videos. I highly recommend it if you are interested in home brewing or microbrews or beer in general. Check it out when you get a chance!

The guys from BrewingTV.

Monday, April 9, 2012

What I am Brewing: Kitsteiner Porter #4

Initially brewed 16 Sept 2011.
Updated article with photo: 9 April 2012.

My finished Porter #4!

Temporary Name: Porter Number 4
Finished Name: Still debating...

History of this beer:  Porter is a dark, rich traditional English ale.  First documented mention of porter was in 1721 as a beer that was popular with the street and river porters in London.  It was likely produced for dozens of years before this.  There developed two versions of this beer: regular porter and stout, or stronger, porter.  The name "stout porter" soon lost the second half of its name, and it is now known only as "stout".  For more on the very interesting history of this beer, check out these articles:
Wikipedia - Porter (beer)
Beeradvocate - What the hell is a porter?

Ingredients:
  • 3 lbs - Muntons Dried Plain Dark Malt, 3 lbs
  • 3 lbs - Muntons Dried Plain Light Malt, 3 lbs
  • 1 lb - Grains: Briess Black Malt
  • 1/2 lb - Grains: Simpson's Dark Crystal
  • 1/2 lb - Grains: Briess Chocolate Malt
  • 1/4 lb - Grains: Simpson's Coffee Malt
  • 6 oz - Hershey's Cocoa Unsweetened, Natural
  • 8 oz - Grandma's Original Molasses
  • 1.5 oz - Hops: Challenger Pellets (AA 7.0%), boiling hops
  • 1.0 oz - Hops: USA Fuggles, (AA 4.8%), finishing hops
  • Yeast - Nottingham Ale Yeast 11 gram package

Method:
  • Simmer crushed grains in 2 gallons of water at 160 degrees F for 30 minutes.
  • Remove grains.
  • Bring to boil.
  • Add malt extracts, cocoa, molasses, and boiling hops, and return to boil.
  • Boil for 60 minutes.
  • Add finishing hops for last 2 minutes of boil.
  • Strain into 5 gallon carboy with 2 gallons of cold water.
  • Top off for total of 5 gallons.
  • Add yeast when cool (below 75 degrees F).
  • Ferment, rack, prime with 3/4 cup corn sugar, bottle, age, drink!

Notes:
I actually wanted to use Wyeast London Ale yeast.  I had the carboy sitting on the counter cooling off for a few hours.  We went out for the afternoon.  Before bed, I prepared the yeast and then pitched it (added it to the carboy) without checking the temperature.  I then checked the temperature, and it was 88 degrees F.  Ughh!  Likely too hot for the yeast to survive.  But I thought I would give it some time to see.  Well, after about 18 hrs with no activity in the carboy, and with my paranoia rising that another life form would start to grow, I made up and pitched the Nottingham yeast.  Within about 6 hrs, there was good activity in the carboy, and within 12 hrs, there was substantial fermentation going.  Is this a mix of just a few rugged Wyeast yeast and mostly Nottingham, all Nottingham, or mostly Nottingham and whatever was starting to grow before I added the new yeast... I don't know.  But so far so good.

Two weeks after bottling: Very rich, soapy odor, medicinal aftertaste... is this batch ruined???

Five weeks after bottling: Still very rich, very flavorful, great head, no soapy odor or medicinal aftertaste. Deep flavor, slightly coffee and chocolate with some bitterness. Very smooth, but not creamy.


Tuesday, January 24, 2012

Permaculture Plants: Hops

Hops... the favorite vine of brewers!


Common Name: Hops
Scientific Name: Humulus lupulus
Family: Cannabaceae (Hemp Family)

The flower clusters are called cones.

Description:
Hops are twining perennial climbers that are fairly drought tolerant. The female plants produce flower cones (also called hops) that are used to provide bitterness and preservation to beer. There are a number of full sized and dwarf varieties, and as a homebrewer of beer I plan to grow quite a few varieties when I finally get the chance.

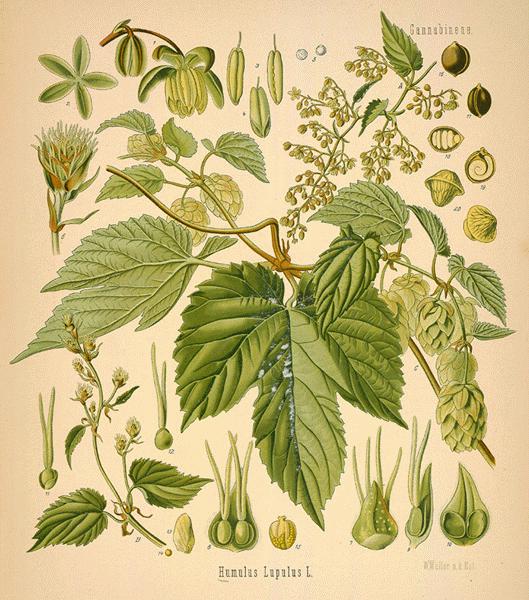
Humulus lupulus by Kholer

History:
The first documented cultivation of hops was in 736 AD in Hallertau region (part of Bavaria) of Germany. Hops have been growing here ever since, and close to one quarter of the world's hops are now produced in this area. However, in the first century, hops was not a prime beer additive. Over time, in spite of legal battles and elitists' bans on the plant, hops eventually became the primary bittering agent and preservative in beer. It was first grown in the U.S. in 1629.


A hops arbor growing in a well manicured garden.


Trivia:

  • The female plant produces clusters of flowers called Cones or Strobiles. These resemble pale, drooping, green flowers.
  • Only cones from the female plant are used in beer making.
  • Before hops, a wide variety of flowers and herbs were used to bitter the sweet malted barley: marigold, dandelion, burdock, horehound, heather, etc.
  • Most hops are dried before using in beer.
  • The resins in the flowers are what give the distinct qualities to hops. The two main components are alpha and beta acids.
  • Alpha acids are responsible for the antibiotic effect and the bittering flavor in hops.
  • Beta acids are responsible for the aroma - I love this aroma!
  • The "Noble Hops" (Hallertau, Tettnanger, Spalt, and Saaz cultivars, all German) are classic low bitterness, high aroma hops, although some consider two English varieties (Fuggles and East Kent Goldings) to be "Noble" as well.

Do I really need to give more motivation?

USING THIS PLANT
Primary Uses:

  • Female "flowers" (Cones) used in beer making


Secondary Uses:

  • Young Spring shoots can be cooked as vegetables, like asparagus, and was a Roman specialty
  • Tea (cones and/or leaves)
  • Medicinal uses - historically used for anxiety, restlessness, insomnia, and anti-bacterial agent.
  • has been used in sausages, cereals, non-beer beverages, tobacco, and perfumes.
  • Stems have been thought to produce fiber and paper.
  • Leaves and cones used to produce a brown dye


Yield: Varies greatly on the variety and growing conditions.
Harvesting: Female cones are harvested in autumn.  Bloom to harvest is about 40 days.
Storage: Unless used immediately, drying is the best method for preservation. Once dried, hops can be stored in a sealed bag (as close to vacuum as you can get it) for many months. This can extend the brewing potential of home raised hops.

Resins of the hops flower (the yellow globs) contain the alpha and beta acids.

DESIGNING WITH THIS PLANT
USDA Hardiness Zone: 4-5
Chill Requirement: Likely, but none documented that I could find

Plant Type: Large herbaceous vining/climbing plant
Leaf Type: Deciduous
Forest Garden Use: Vertical Layer (Vining/Climbing)
Cultivars/Varieties: Many varieties available.

Pollination: Hops are dioecious (male and female plants). You only need one male vine for a number of female plants if you are interested in propagating from seed; however, this is rarely done.

Flowering: Summer

Life Span:
Years to Begin Bearing: 2-3 years
Years to Maximum Bearing: 3-4 years
Years of Useful Life: No good information found

The development of the Hops leaf... becoming more complex with age.

The start of the female flower cluster... known as the female inflorescence.

PHYSICAL CHARACTERISTICS OF THIS PLANT
Size: 15-30 feet (4.5 - 9 meters) tall and wide; some dwarf varieties exist that are about half this size
Roots: Rhizomatous - underground stems that send up shoots and down roots
Growth Rate: Medium to Fast depending on the variety


GROWING CONDITIONS FOR THIS PLANT
Light: Prefers full sun
Shade: Tolerates moderate shade
Moisture: Medium moist to dry
pH: prefers fairly neutral soil (6.1 - 7.0)

Special Considerations for Growing: 
Hops has been grown commercially for a long time, so there are some very specific ways in which it is grown to produce maximum yields, make harvesting easier, make treating pests easier, and make the most money... however, if you plant hops in a Forest Garden setting, then you can pretty much plant it is a sunny, well ventilated location with a structure/support to grow, and leave it be!

Martin Crawford, world expert on forest gardening, recommends growing hops on the south side of large, non-fruiting/nut trees like the nitrogen-fixing Alders. This allows nitrogen for the fast growing hops, structure for the hops to climb, but does not inhibit yield of a high production tree. Brilliant!

Propagation:  Root cuttings, division (in Spring), or layering.  Rarely grown from seed as it will not produce true to type... meaning, plants grown from seed will produce plants with very different flower characteristics.  Since the flowers of specific varieties are used to give distinct flavors and aromas to beer, then growers usually want these characteristics preserved... hence the aforementioned propagation methods.

Maintenance:
Minimal once established. Some forest gardeners will leave the old stems as a trellis for new growth.

Concerns:
Poisonous to dogs - results in hyperthermia, seizures, and death.
Some people can develop dermatitis (skin irritation) while picking the hops.
Sprawling vigorous growth can overtake some areas if not kept in check or planted with the growth in mind.


Young hops shoots collected in the Spring can be treated and eaten just like asparagus.

Monday, October 17, 2011

Recipe and Permaculture Tip: One-Minute Bread

An ridiculously easy recipe for a great loaf of bread!

Here is the list of ingredients... yes, that is it.


A good friend of mine (Jake) sent me this link quite some time ago.  This is a simple bread to make, and it is really quite good.  It obviously takes more than just one minute to make the bread, but the active amount of time you are really doing anything with this bread is under ten minutes.

There really are only four ingredients.  I use one bread yeast pack which is the 1/4 teaspoon required.  You can add any number of spices if you want at the end.

I will use this recipe when I want something that is a bit more bread-like than my Beer Bread but less time and quantity than the Artisan Bread in Five Minutes a Day.  It is great served with a good quality cheese or sliced thin lengthwise and used for sandwiches.

It is so easy!

Permaculture Tip
This tip was told to me by Jake (who sent the link above) a few months after sending me the bread recipe.  

For all you homebrewers out there...  You know when you are done fermenting a batch of beer and you have that stuff left over on the bottom of the carboy?  The technical term is "trub" (it comes from the German word for lees).  Well, this sediment that remains is composed of heavy fats, proteins, and inactive yeasts.  Jake and his friend were sitting in the kitchen cleaning up after bottling a batch of beer.  Jake's friend says, "I bet you that stuff there would be great in bread."  He was right!

This was a brilliant "ah-ha!" moment.

Now, whenever I drain the beer off the trub, I always save it.  I try to use it later that night.  I will substitute one cup of water for one cup of trub in the recipe listed above.  Sometimes I'll use a little more.  I may need to add a bit more warm water to get the consistency of the dough right.  Just experiment and see what works.

We will end up with a richer, more complex-tasting bread that has an amazing flavor.  This is a implementation of Permaculture Principle Six: Produce No Waste.  What we have been throwing away, discarded as waste, is an amazing ingredient in bread adding nutrition and flavor.  What a great idea!

Thanks, Jake!


A Permaculture Tip is an idea that is derived from observing and interacting with nature.  It is simple.  It is safe.  It is effective.  It helps build a sustainable system of agriculture and life in general.  If you have any Permaculture Tips you would like to share, please let me know.  I will post it here, give you the credit, and post a link to your blog or website if you have one.  Email me here: kitsteiner@hotmail.com

Thursday, October 13, 2011

Beer and Food Pairing

Crab Rotini and Cheese paired with the organic amber ale, Monk in the Trunk
Just one of many beer and food pairings from The Beer Cook

I have to give credit to my brother Ray for sending me a link to The Beer Cook blog.  This is a blog written by a young woman who loves beer and food.  Her blog is not fancy, but it is very inspirational, and it has great photos.  I really recommend taking a look at it.  Seriously, it is really fun.

After perusing this blog for a bit, I really wanted to see what else was out there on the web dealing with Beer and Food Pairing.  There are many full books written about food and wine pairing, but unfortunately the beer and food pairing research is still in its infancy.  Hopefully my research will save you some time looking and give you more time experimenting and enjoying!

When you are done reading about all these specialty beers, I have to ask... do you really need even more motivation to start brewing your own beer?


Beeradvocate Beer and Food Pairing Guide:  A great little pairing search engine.  You select the style or type of food from a drop down menu, and you get few to a couple dozen beer style choices with some specific brands from which to choose.

Brewers Association Craft Beer and Food Pairing Chart:  A handy, single-paged PDF that lists the Beer Type with a graphical description and then recommendations for Suggested Foods, Cheese, and Dessert pairings.  Also provides glassware recommendations and serving temperature suggestions.  Love this!

Samuel Adams Food and Beer Pairings:  I had to include this Beer and Food Pairing guide.  First it is well done.  You can search by which Sam Adams beer you have, and you will get food choices; or you can search by what you are eating, and you will get Sam Adams beer recommendations.  Second, I really like Samuel Adams, their philosophy, their history, and of course their beer!

Artisanal Premium Cheese Beer and Cheese Pairings: You select the beer style (by clicking on the photo) and they will link you to a short cheese pairing tip page with suggestions of cheese you can buy from them.  This is the best guide I found for recommendations on pairing beer with cheese.


Finally, here are a few articles on Beer and Food Pairing:

The Art of Picking the Perfect Beer for a Meal - Cheyl Lu-Lien Tan (Wall Street Journal)

There's Room at the Table for Beer, Too - Joshua Bernstein (Imbibe)

Beer Pairings Menu - Lucy Buringham (Oregon Live)

How to Have a Beer-Pairing Dinner at Home - David Hagedorn (The Washington Post)


Tuesday, August 2, 2011

Recipe: Beer Bread

Beer Bread... so easy and so delicious!

After my previous post on the book, Artisan Bread in 5 minutes a Day, I couldn't resist adding one of my favorite quick bread recipes.  Beer Bread is a thick, hearty bread that is great on its own, but it can also have so many variations and improvisations.  No, it doesn't taste like beer!  However, it will have the essential character of the beer, so a dark beer will give more rich flavor than a light beer.

The beer's carbonation, along with the baking powder, is what gives the bread volume and "rise".  It is not the yeast in the beer (if any are left).  Making this bread with homebrewed beer is especially rewarding.


Here is the basic recipe for Beer Bread:

3 cups All-Purpose Flour (or Self Rising Flour)
3 Tablespoons White Sugar 
3 teaspoons Baking Powder (omit if using Self Rising Flour)
1 teaspoon salt (omit if using Self Rising Flour)
1 bottle (12 ounce) Beer

- Preheat oven to 350-375 F (175-190 C)
- Sift the flour.
- Add sugar, baking powder, and salt to flour.  Mix lightly.
- Pour in beer.
- Mix batter with wooden spoon until all dry ingredients are mixed in.  Don't over mix.  Batter will be very sticky.
- Pour into greased loaf pan.
- Bake for 50-60 minutes.
- Allow to rest for only a few minutes before cutting and serving.
- I have no idea if this bread lasts more than a few days, because it is always gone by then.

A few tips:

  • Always sift the flour - I will often sift 2-3 times.  Omit this step and your bread will be a brick!
  • Use a good quality beer.  I think the richer and more complex and dark the beer, the more flavorful the bread.  One of my favorites is Blue Moon... but I also really enjoy my own dark ale.
  • You can add any spices you would like; it just depends on what you are going to eat with it.  For example, add some rosemary and thyme to make a good bread with a roast.  Add some basil and garlic powder with an Italian meal.  Add some sugar and cinnamon for a dessert style bread. 
  • Sprinkle some cheese on the top, or mix it with the batter.
  • One of my favorite ways to eat this is fresh and hot, smothered with butter and fruit preserves or honey... amazing!

Friday, May 27, 2011

Homebrewing Beer


Before we get to beer, let's talk about homebrewing in general first...

What is Homebrewing?
"Homebrewing is the brewing of beer, wine, cider and other beverages, both alcoholic and non-alcoholic, through fermentation on a small scale as a hobby for personal consumption, free distribution at social gatherings, amateur brewing competitions or other non-commercial reasons."
http://en.wikipedia.org/wiki/Homebrewing

Some quick definitions of alcoholic beverages:
Beer: Made from cereal grains, usually barley but also wheat, oat, corn, rye, etc.
Wine: Made from grapes.
Cider: Made from apples.
Perry: Made from pears.
Mead: Made from honey... a.k.a. Honey Wine
Cyzer: Made from honey and apples.
Pider: Made from apples and pears.
Pyment: Made from honey and grapes.
Melomel: Made from honey and other fruits.
Country Wine: Wine made from fruit other than grapes.
Why Homebrew?
  1. Price:  It is much cheaper to make your own.  At a minimum, it is 50% cheaper.
  2. Quality:  If I make it, I know what I put in it.
  3. Variety:  I can make things I cannot buy is stores.  I can even make my own varieties!
  4. Self-Sufficiency:  I like to know how to make things from “as scratch” as possible.
  5. Health:  Drinking alcohol, in moderation, is associated with many health benefits.
  6. It is FUN!
Basics of Brewing Beer
Note: This is a VERY basic overview.  If you are an experienced homebrewer, forgive the brevity and exclusion of some detail.

Ingredients:
Malt
Hops
Yeast
Sugar

Malt
This is germinated grain (usually barley) that has been allowed to dry in a process called “malting”.  If you raise your own grains, you can do this yourself.  If you don’t raise your own grains, then you can purchase malt.  It usually comes in either liquid or dry forms.  The liquid form is partially evaporated and sold in cans labeled Liquid Malt Extract.  The dry form is the same substance, but it is evaporated even further into a powdered form and sold as Dry Malt Extract.
Geminated Barley

Variety of dried ("malted") grains.
Hops
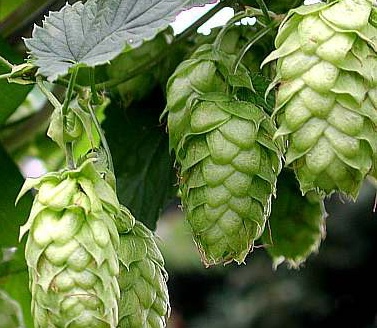
Hops is a flower from the Hops vine.  It is used to add bitterness and aroma to the beer.  Bitterness is required to counteract the overly sweet taste of fermented malt.  Hops really became associated with beer due to its preservative ability.  Traditionally, without hops, beer would go bad much faster.  Hops can be used fresh or dried.  The dried forms are sold as whole flowers, pellets, and plugs.
Hops on the vine.
Yeast
Yeast is used to convert the sugars from the malt to alcohol.  There are many varieties of yeast in the world, but the one most used in brewing is Saccharomyces cerevisiae, and there are hundreds of strains to choose from.  This is usually sold in liquid or dry powdered form.   Some people even culture their own strains.
Dried brewer's yeast.
Sugar
This is used after the beer has already undergone its primary fermentation.  Adding some sugar right before bottling or kegging allows the remaining yeast in the beer to create additional carbon dioxide under pressure… carbonation!  Many types of sugar can be used, but most common is corn sugar.
Basic Homebrewing Process for a simple Ale
  1. Malted barley is boiled in water.
  2. Hops is added.
  3. Allow the mixture to cool.
  4. Yeast is added (“pitched”).
  5. This concoction (wort) is allowed to ferment (typically for one to 3 weeks). You now have uncarbonated beer!
  6. Sugar is added.
  7. The beer is bottled or kegged.
  8. Wait another two weeks.
  9. Drink your beer!
Overall, homebrewing beer is a very simple process; however, there are thousands of variations to this simple process.  Which grains to use (barley, wheat, oats, rye, corn, etc).  How the grain is processed while malting (light, amber, dark, chocolate, etc.).  How long and how much  malt is boiled with the water.  When and how much and what type of hops is added.  What type of yeast is used.  How long and the temperature during fermentation.  What type of sugar is added.  What other ingredients are added (fruit, herbs, spices, etc).

With all these variables, there are literally thousands of beers you can make…  what are you waiting for?

Resource: This is my favorite book on homegrewing beer.