Showing posts with label Homebrewing. Show all posts

Friday, March 22, 2013

Update - What I am Brewing: Azorean Blackberry Fig Honey Wine

My Blackberry Fig Mead... after almost 7 months of aging, it is still not ready!

Update: 22 March 2013
I finally had some time to rack (transfer) the mead into another carboy (glass jug). As you can see in the photo above, the red color has remained, though it has softened a bit. I stole a small glass to sample it. The mead was a very beautiful light pink in color, not the deeper red of the whole five gallon (19 L) batch. There was a very harsh, acidic first taste to it, but after that passes there was a very good flavor that lingered around for quite a while. I couldn't quite identify what the flavor was, probably because I had such a small sample, but I really like it. I am hoping that with some additional aging, the harsh flavor will mellow.

Today, I racked the mead to a new carboy leaving the lees (sediment) on the bottom of the original carboy. The new volume was lower than desired, so I added some additional honey water. I mixed 6 ounces honey with 18 ounces filtered water. This got it closer to the top of the carboy. I could have added more, but to be honest, I wasn't exactly sure how much additional volume I needed, and I didn't have a whole lot of time to mix and add even more.

Finally, I added a pack of yeast (Saccharomyces cervisiae (ex-bayanus) for sparkling wines from Lalvin). My original plan was to make this mead entirely a wild fermentation experiment. However, after waiting seven months, I think I lost my nerve! The flavor is developing well, and I really just didn't want to mess things up, especially after such a long wait. My future plan will be to run some side by side experiments (which I will document here) comparing completely wild fermentation, partially wild fermentation (like this one), and as non-wild as I can make it. Then I will be able to do some side-by-side taste tests and see which one turns out best. However, with just one batch, I really wanted success more than scientific results. The raw material was more difficult to come by since I was not raising the blackberries or honey myself. Once I get these things producing on my land, then I will be doing quite a lot of experimentation.

This batch of mead likely needs another 3-6 months before it is truly drinkable. I will let this fermentation cycle run its course, and then I will bottle it. Once in the bottles, I will be able to sample some every few months and taste how it matures. I expect it will only get better with time.


Name: Blackberry Fig Mead
Brew Date: 28 August 2012

Okay, to be technically correct, a mead is a honey wine. When fruit is added to mead, it is then called a melomel. So this concoction should be called a Blackberry Fig Melomel, but few people know what a mead is, let alone a melomel. With all that said, here is what I did...

Ingredients:
  • 1 Gallon Azorean Raw Honey
  • 1 Gallon Figs, mostly skinned, from my garden
  • 1 Pint Azorean Blackberries, from my garden wall
  • 4 Gallons Water

Method:
  • In a 6.5 gallon bucket, slowly added 1 gallon honey to 4 gallons water, stirring constantly
  • Added figs and stirred
  • Stirred 3-4 times a day - a cap of fruit and seeds formed each time the water settled and needed to be broken up a few times each day
  • Let ferment for a total of 3 days
  • Racked (transferred the liquid) to a 5 gallon carboy, leaving behind the fruit and lees
  • Immediately added fresh blackberries, added air lock
  • Let ferment for 7 days
  • Racked to another 5 gallon carboy
  • Topped off with fresh honey water (with same 1:4 ratio as initial)
  • Let slowly ferment and mature... this is currently where things are at

Notes:
  • This is a completely wild fermentation. I didn't boil or sterilize any of the honey or fruit. No packaged or extra yeast was added. The yeast that is fermenting this mead is only from the raw honey, the figs, and the blackberries.
  • I still maintained a very clean environment, as much as I would if I were brewing a beer with selected yeast strains.
  • I left a few skins on the figs as this is where I figured the highest concentration of natural yeasts would reside. However, I had read that the fig skins can give a bit of an off flavor, so the vast majority of the figs were skinned.
  • My goal is to let this ferment/age for a few months, maybe rack once or twice more, then bottle and age for 6-12 months before sampling... if I can wait that long.

Figs from my garden.

Day 2 of the fig and honey fermentation... smelled like Fig Newtons!

The melomel after the first racking.

The pint of blackberries from my garden wall.
I only fell off the wall once during harvesting!

Just after I added the blackberries.
Next to this is a small reserve of honey water that wouldn't fit.
I am letting this ferment without any fruit as well.

After about 5 days of fermenting with the blackberries, the liquid took on a beautiful pink hue.

Racked off the blackberries, topped off, and ready for aging.

Just racked into a clean carboy after 7 months of aging.


Thursday, November 15, 2012

What I am Brewing: Azorean Blackberry Porter

A previous Porter I brewed. One of my favorite styles of beer!
 
Name: Azorean Blackberry Porter
 
Comments:

My goal with this beer was to make a dark, dessert style beer for the Winter months. It is bubbling along right now, the blackberries slowly giving up their flavor and aroma (I hope!) into the dark brown Porter. Should be perfect for a cold night on the island sitting in front of the fireplace listening to the wind howl and the waves crash outside.
 
Azorean Blackberries (Rubus hochstetterorum) from my backyard garden wall.
 
Ingredients:
  • 6 lbs - Midwest Liquid Malt Extract Dark
  • 3.3 lbs - Midwest Liquid Malt Extract Gold
  • 1/2 lb - Grains: Caramel 120
  • 1/4 lb - Grains: Chocolate Malt
  • 1/4 lb - Grains: Black Malt
  • 1.5 oz - Hops: Tettnanger, US (AA 6.1%), boiling hops
  • 1.0 oz - Hops: Willamette (AA 6.4%), finishing hops
  • 3 lbs - Azorean Blackberries (previously frozen - picked from my garden)
  • Yeast - Safale S-04
     
     
Method:
  • Simmer crushed grains in 5 gallons of water at 155 degrees F for 30 minutes.
  • Remove grains from water
  • Add more water to bring total to 5 gallons (some water lost in heating/steeping time)
  • Bring to boil.
  • Add malt extracts and return to boil
  • Add boiling hops for 60 minutes
  • Add finishing hops at T-2 minutes
  • Transfer hot wort to 6.5 gallon brewing bucket containing thawed blackberries (the wort was just below boiling, so the blackberries were sterilized but not boiled)
  • Add yeast when completely cool (below 75 degrees F)
  • Rack off the fruit at 7 days
  • Allowed to settle for a day or two in a 5 gallon carboy - If the fermentation is still moving along, I may keep it in here for a while longer
  • Rack, prime with 3/4 cup corn sugar, bottle, age, drink!

Notes:
  • I would loved to have used more blackberries, but that was all I had. The blackberry season is over here, so I will need to wait until next year for more berries... local ones at least. Ideally, I would have at least double that amount. Hopefully I didn't destroy all the flavor with the hot wort. Hopefully I won't lose the small amount of berry essence to the fermentation gasses, krause, or trub. No worries though!
  • Depending on the taste of this beer, in the future I may consider adding the fruit to the secondary instead. The alcohol and pH at that point will likely inhibit any wild yeasts and bacteria, so I may be a better flavor infusion from the blackberries. This experimenting is why homebrewing is so fun!

Sunday, October 21, 2012

What I am Brewing: Holiday Brew

My cooling wort just waiting for some yeast

Name: Holiday Brew #1


Comments:
 
My goal with this beer was to make a lightly spiced, dark ale for the holidays. As we are in the second half of October already, this beer should be ready just in time for Thanksgiving. I'm hoping there will still be some left by Christmas!

Cinnamon stick, fresh ginger (needs chopping), whole nutmeg (needs grinding), and specialty grains (needs crushing)

Amarillo Hops (left), Vanguard Hops (right), and spices ready to go

Ingredients:
  • 3 lbs - Muntons Dried Plain Dark Malt
  • 3 lbs - Muntons Dried Plain Aber Malt
  • 2 lbs - Muntons Dried Plain Light Malt
  • 1/2 lb - Grains: Crystal 50/60
  • 1/2 lb - Grains: Caramel 120
  • 1 Cinnamon Stick - whole
  • 1 Teaspoon Nutmeg - freshly ground
  • 1 Teaspoon Ginger - freshly chopped
  • 3 Cloves - whole
  • 1.0 oz - Hops: Vanguard (AA 4.8%), boiling hops
  • 1.0 oz - Hops: Amarillo (AA 7.1%), finishing hops
  • Yeast - Safale S-04


Method:
  • Simmer crushed grains in 3 gallons of water at 155 degrees F for 30 minutes.
  • Rinse grains with 1 gallon water - drained right into the brew kettle
  • Add more water to bring total to 5 gallons
  • Bring to boil.
  • Add malt extracts and return to boil
  • Add boiling hops for 60 minutes
  • Add spices at T-10 minutes
  • Add finishing hops at T-2 minutes
  • Cool and transfer to clean 5 gallon carboy
  • Add yeast when completely cool (below 75 degrees F)
  • Ferment, rack, prime with 3/4 cup corn sugar, bottle, age, drink!


Monday, July 23, 2012

What I am Brewing: Dark Ale #6

My dark ale, just before the yeast was pitched (added).

Temporary Name: Dark Ale #6
Finished Name: Still debating...


Comments:
My initial goals in designing this beer was to first, use only ingredients I had already, and second, to try and make a really dark Irish Red Ale. Beer Advocate descibes Irish Red Ales as: A bit sweet, with a lightly hopped tea-like flavor, and an even dextrinous body, Irish Red Ales are easy to please. Look for well-rounded and blanced flavors, and a pleasant toasted malt character in many examples. A drying finish is common.

Unfortunately, I think I made this one too dark. You can see in the photo how this is much more of a dark brown ale. When cleaning up my equipment after brewing, there is a red tint to everything, but I think I used too much of the Roasted Barley. We will see how this progresses.

Ingredients:
  • 4 lbs - Muntons Dried Plain Light Malt
  • 1 lb - Muntons Dried Plain Dark Malt
  • 1 lb - Grains: Simpson's Dark Crystal
  • 1/2 lb - Grains: Simpson's Roasted Barley
  • 1/4 lb - Grains: Weyermann Cara Red
  • 1.0 oz - Hops: First Gold Pellets (AA 8.0%), boiling hops
  • 1.0 oz - Hops: Willamette Pellets, (AA 4.8%), finishing hops
  • Yeast - Wyeast Irish Red Ale Yeast

Method:
  • Simmer crushed grains in 2 gallons of water at 150-160 degrees F for 30 minutes.
  • Remove grains.
  • Bring to boil.
  • Add malt extracts and boiling hops, and return to boil.
  • Boil for 60 minutes.
  • Add finishing hops for last 1 minute of boil.
  • Strain into 5 gallon carboy with 2 gallons of cold water.
  • Top off for total of 5 gallons.
  • Add yeast when cool (below 75 degrees F).
  • Ferment, rack, prime with 3/4 cup corn sugar, bottle, age, drink!

Friday, May 11, 2012

Brewing TV

My friend Jake has once again pointed me to a goldmine of information. This time it is a great website, BrewingTV.  I absolutely love this site. Great information. Fun videos. I highly recommend it if you are interested in home brewing or microbrews or beer in general. Check it out when you get a chance!

The guys from BrewingTV.

Monday, April 9, 2012

What I am Brewing: Kitsteiner Porter #4

Initially brewed 16 Sept 2011.
Updated article with photo: 9 April 2012.

My finished Porter #4!

Temporary Name: Porter Number 4
Finished Name: Still debating...

History of this beer:  Porter is a dark, rich traditional English ale.  First documented mention of porter was in 1721 as a beer that was popular with the street and river porters in London.  It was likely produced for dozens of years before this.  There developed two versions of this beer: regular porter and stout, or stronger, porter.  The name "stout porter" soon lost the second half of its name, and it is now known only as "stout".  For more on the very interesting history of this beer, check out these articles:
Wikipedia - Porter (beer)
Beeradvocate - What the hell is a porter?

Ingredients:
  • 3 lbs - Muntons Dried Plain Dark Malt, 3 lbs
  • 3 lbs - Muntons Dried Plain Light Malt, 3 lbs
  • 1 lb - Grains: Briess Black Malt
  • 1/2 lb - Grains: Simpson's Dark Crystal
  • 1/2 lb - Grains: Briess Chocolate Malt
  • 1/4 lb - Grains: Simpson's Coffee Malt
  • 6 oz - Hershey's Cocoa Unsweetened, Natural
  • 8 oz - Grandma's Original Molasses
  • 1.5 oz - Hops: Challenger Pellets (AA 7.0%), boiling hops
  • 1.0 oz - Hops: USA Fuggles, (AA 4.8%), finishing hops
  • Yeast - Nottingham Ale Yeast 11 gram package

Method:
  • Simmer crushed grains in 2 gallons of water at 160 degrees F for 30 minutes.
  • Remove grains.
  • Bring to boil.
  • Add malt extracts, cocoa, molasses, and boiling hops, and return to boil.
  • Boil for 60 minutes.
  • Add finishing hops for last 2 minutes of boil.
  • Strain into 5 gallon carboy with 2 gallons of cold water.
  • Top off for total of 5 gallons.
  • Add yeast when cool (below 75 degrees F).
  • Ferment, rack, prime with 3/4 cup corn sugar, bottle, age, drink!

Notes:
I actually wanted to use Wyeast London Ale yeast.  I had the carboy sitting on the counter cooling off for a few hours.  We went out for the afternoon.  Before bed, I prepared the yeast and then pitched it (added it to the carboy) without checking the temperature.  I then checked the temperature, and it was 88 degrees F.  Ughh!  Likely too hot for the yeast to survive.  But I thought I would give it some time to see.  Well, after about 18 hrs with no activity in the carboy, and with my paranoia rising that another life form would start to grow, I made up and pitched the Nottingham yeast.  Within about 6 hrs, there was good activity in the carboy, and within 12 hrs, there was substantial fermentation going.  Is this a mix of just a few rugged Wyeast yeast and mostly Nottingham, all Nottingham, or mostly Nottingham and whatever was starting to grow before I added the new yeast... I don't know.  But so far so good.

Two weeks after bottling: Very rich, soapy odor, medicinal aftertaste... is this batch ruined???

Five weeks after bottling: Still very rich, very flavorful, great head, no soapy odor or medicinal aftertaste. Deep flavor, slightly coffee and chocolate with some bitterness. Very smooth, but not creamy.


Monday, November 28, 2011

Recipe: Apple Butter


So, what to do with left over apple pulp and skins from our Hard Cider Homebrew session on the Thanksgiving weekend?

Throw it away?   That seemed like a big waste.
Turn it into compost?  Well, it has to age for about 2 years due to the high acidity - it will kill plants.
Use it to kill plants?  Not a bad idea if I had a fence line I wanted to keep weed free... but no fence lines for me right now.

How about making some apple butter?  Perfect!

Apple butter is not really butter (from milk), but it is a creamy, concentrated apple sauce with spices.  It is delicious on a piece of warm toast or on a hot biscuit.  It was a common sweet treat, side dish, ingredient in baked goods, or condiment in the Colonial United States.  I can see why.  I have only met one person (eh-hmm, Veronica), who does not like apple butter.  However, everyone else usually goes back for seconds and thirds when a jar is opened.

We ended up with a bunch of pulp after juicing close to 200 lbs of fruit.  Well over half of it was from uncored apples, so it had bit of stem and seed in it.  However, thanks to Jake's forethought, we cored a decent amount of apples and quince and saved that pulp for making apple butter.

Here is the basic recipe for apple butter:

Ingredients:
  • 4 parts fruit (this can be cored apples, skins, or pulp)
  • 1 part sugar (this can be brown sugar, white table sugar, or honey)
  • Spices to taste (common spices are cinnamon and cloves)

 The heated apple mixture (left)
Pureeing the mixture (center)
The pureed apple mixture (right)


Method:
  • Heat the fruit, sugar, and spices over low medium heat until tender - keep stirring to avoid scorching (you can see this being done in the photo at the top of this post)
  • You may need to add some water to help with consistency
  • Transfer to a blender or food processor or food mill and puree it until smooth (like apple sauce)
  • Put back on the heat and simmer until reduced and darkened - it should be thick and almost creamy... buttery!

The spices I used in this recipe
(cloves, nutmeg, allspice, cinnamon, and black pepper)

Notes:
  • Many spices can be used.  I used cinnamon, cloves, nutmeg, allspice, and black pepper.  Yeah, black pepper.  If used in small amounts in sweet dishes like apple butter and apple-quince pie is basically a natural flavor enhancer.
  • This is a very easy recipe to make, it just takes some time and attention.  
  • A crock pot works great for cooking the pureed fruit.  I put mine in over night on low and then simmered it down on the stove for a few hours more the next morning.

The finished apple butter... dark, glossy, and creamy!  Delicious!


Saturday, November 26, 2011

What I am Brewing: Thanksgiving Turkey Cider


A whole lot of apples... ready for cider!
We made two 5 gallon batches with this fruit.
From top to bottom: 
4 types of local Turkish apples
Turkish Granny Smith apples
Local Turkish quince

So I finally got around to documenting one of my brew sessions.  This time I was making Hard Apple Cider with a few of my friends (Jake and Brianna).  Local apples are rather cheap this time of year, so this is a great time to make some cider.  

There are quite a few hard apple cider recipes available online.  There are also a number of books out there on the subject as well.  This is not the only way to make hard apple cider.  There is some more professional equipment out there (i.e. grinders, presses, etc.), but we don't have it.  The bottom line is that if I can do this with the basic beer homebrewing equipment that I have, anyone can do this.

Give it a try!

I'll start first with my brewing notes:

Name: Thanksgiving Turkey Cider

History of this drink:  
Cider is a very old and very famous (and infamous) alcoholic beverage.  Yes, there is non-alcoholic cider.  This is just unfiltered apple juice.  Filtered apple juice is sold as "Apple Juice", and unfiltered apple juice is sold as "Cider" in grocery stores in the U.S.  Hard Cider, or alcoholic cider, is what we made the day after Thanksgiving with local ingredients from Turkey... hence the name.  In the U.S., cider has a long history.  It was the most popular drink in Colonial times.  This was mainly due to the fact that most water was not safe to drink (boiling and/or filtration was not yet understood).  Hard Cider remained a very popular drink in the U.S. until Prohibition (13 years in the U.S when all alcoholic beverages were illegal - 1920-1933), but it never regained its popularity in post-Prohibition times.  In many other parts of the world, especially the UK, cider and cider making has a long and respected history, and it is still a popular drink today.

Ingredients:
  • 3 Gallons (60%) Neutral Base: Local Turkish apples from the open air market

         - 10 kg (22 lbs) Light Green Apple
    
     - 5 kg (11 lbs) Red Apple with Green Blush
    
     - 5 kg (11 lbs) Pale Yellow Apple with Light Brown Spots
    
     - 5 kg (11 lbs) Red Apple with Light Yellow Stripes
  • 1 Gallon (20%) Tart Apple

         - ~8.5 kg (18.75 lbs) Granny Smith Apples
  • 1 Gallon (20%) Aromatic / Astringent Apples

         - 10.8 kg (24 lbs) Quince - yeah not technically an apple, but the only thing I could find with high tannin content
  • 2 lbs Sue Bee Clover Honey
  • Wyeast 4766 Cider Yeast

Method:
  • Juiced all the apples in Jake's fruit/vegetable juicer
  • Placed all the juice into a large stainless steel stockpot
  • Brought to a low simmer - just giving off steam but not bubbles forming at all
  • Added the honey
  • Simmered for 45 minutes - never allowing a boil
  • Let cool on the stovetop for about an hour
  • Transferred to a sterilized (with bleach) glass 5 gallon (19 liter) carboy
  • Stoppered and allowed to cool overnight
  • In the morning, pitched the yeast
  • Ferment, rack, bottle, age, drink!

Notes:
  • All fruit was grown locally in Turkey.
  • I hope to go back to the market and get the local names of the apples I purchased.  This would be mainly for my own reference, but it would be good to know.
  • Cider is usually made from a blend of apples.  This is because there are only a few apples which contain all the characteristics needed for an "ideal" juice to ferment.  The juice should strike a good balance between Aromatic, Tart, and Astringent.  Astringency is really a measure of the tannins - the dryness factor - that makes makes your mouth feel like you have just bit into an unripe apple or piece of wood.  It is far easier to obtain a blend of apples that fit these flavor characteristics.
  • Quince - I could find no apples that had a high tannin content.  The only apples I could find (other than the tart Granny Smith) were fresh eating, dessert style apples... sweet with medium acidity.  I am guessing on the acidity levels, since I didn't measure the pH.  Quinces are very aromatic and have a high tannin content.  You really can't eat a quince raw because of the tannins.  You have to poach them before eating.  I thought I would stretch the traditional cider definition and add another species of fruit, although quince are very closely related.  You can read more about Quinces here in this article.
  • The honey is from the U.S.  I had planned on purchasing local honey, but did not get to it by brewing time.  Afterwards, I learned that many of the local honey producers water down their honey to increase their income.  I know a local chef who is a "honey snob", so I plan to find a honey supplier through him soon.
  • It takes from about 15-20 lbs (6.5-9.0 kg) apples to make 1 gallon (3.75 L) of juice.  More if the fruit is dryer, like the quince.
  • I used about 98 lbs (44 kg) of fruit for 5 gallons (19 L)... this was 19.5 lbs per gallon (2.3 kg/liter)
  • For future batches, I would like to try a batch without pasteurizing and just using the apples natural yeasts - a bit more risky, but the more traditional way of making cider

The fruit was rinsed in the sink, and the larger apples and quince were cut into smaller pieces.

Jake manned the juicer.  
The juicer is the smaller stainless steel box his hand is resting on, not the larger stainless steel water filter in the back.  The juicer emptied into a small pitcher.  The very dry pulp was pushed out the back into a small receptacle.

You can use a juicer, blender, or food processor to "grind and press" the apples on a smaller level.  I hope to one day have an apple grinder and press, but that will come after I have my own apple trees.

Brianna and I organizing the flow of work.

After the apples were juiced, we strained the juice through a cheesecloth (not pictured).  
The strained juice was held briefly in this bowl before being poured into a 2 quart (0.5 gallon/1.9 L) apple juice bottle.  I used this to keep track of how many gallons of juice we had made/had left to go.

The measured juice was poured into the big stainless steel stockpot (Jake's brew kettle).
After bringing it up to a low simmer to pasteurize the juice.  We simmered for 45 minutes.  The honey was added at the very beginning of the simmering process, added slowly and stirred in.
A lot of impurities floated and collected on the top during the simmering process.

These impurities were easy to skim off the top.  
We tried skimming two ways, first with just a spoon and second with a spoon and this small strainer.
I think I prefer the spoon by itself.  It appears that the strainer left a lot of smaller particles in the juice and resulted in a more cloudy finished product.  However, it may not make any difference after proper racking (siphoning the fermented cider off the sediment that collects at the bottom of the carboy).

The strained and pasteurized apple-quince juice (aka "must") with honey added.
A beautiful reddish-orange color.  This was stoppered and allowed to cool overnight.  You can see that I didn't quite make 5 gallons of juice.  I was closer to 4.5 gallons.  This may be from the skimming process.  In the future, I think I will shoot for about a 10-15% overage.  Whatever doesn't fin in the carboy, I will just drink straight as non-alcoholic cider.

Primary Fermentation
After the yeast was pitched (added to the juice), a "blow off" tube was added to the carboy, and the free end was placed in a water trap.  You can see just the beginnings of the fermentation getting started... it is the thin layer of foam at the top of the juice.  This will turn into a vigorous, rolling fermentation at the beginning of primary fermentation.  When this settles down, I will take off the large tube and put a much smaller air lock in place.

The water trap allows only air to escape, but not work back into the carboy.
I used an old pitcher from a Brita Water Filter.  The spout firmly holds the tubing in place.

The carboy is covered with an old, clean towel.  
This acts just a little as insulation, but mainly as a light barrier.  UV light can cause off flavors to develop in your fermenting cider.

I'll update this post as the cider making process progresses... stay tuned!

Thursday, November 17, 2011

How to Make Cordial


Black Current Cordial
I had a great black current cordial while visiting Luxembourg.  
It was made to raise funds to support restoration and maintenance on Castle Beaufort.

Here is a photo of me and my boys exploring Castle Beaufort!


Cordial.  What is it and how do you make it?

Cordials are a fun way to use fruits from our land, either cultivated or wild.

A cordial is a drink, usually an alcoholic liqueur, with a strong fruit component.  It is typically sweet and very strongly flavored.  While not always alcoholic, most cordials have either brandy or a grain alcohol as its base.  Brandy (distilled wine) is the most common alcoholic base for making cordial, but Vodka (distilled grain or potatoes) is often used.  Whiskey (distilled barley, rye, wheat, or corn) can also be used as well as about any distilled alcohol.

One of the most common non-alcoholic cordials is elderflower cordial.  Instead of an alcoholic base, this cordial is steeped in a concentrated sugar solution.  A cordial that is non-alcoholic and then concentrated is usually called a squash.  Squashes are often mixed with still or sparkling water and served cold.

Traditionally, some cordials were mixed with herbs and were used more as a medicine.  Due to the high alcohol content, cordials were seen as a stimulant, an invigorating drink, a warming drink, or a tonic... a drink that gave a feeling of vigor or well-being.  Alcohol can obviously reduce anxiety and give a feeling of well-being due to its intoxicating properties.  We also now know that alcohol dilates surface blood vessels which happen to be near our skin's temperature sensors.  So when we drink a strongly alcoholic beverage, we get the sensation of warmth.  In reality, our core temperature doesn't change at all.  In older (and colder) times, when a person was trying to stay warm in frigid weather, a nip of strong alcohol was thought to help keep them warm.  In reality, it made them feel warmer, but the dilation of blood vessels close to the skin actually caused a person to lose body heat.

Cherry Cordial (jar on the left) steeping in the sunlight.

So how are cordials made?

The basic cordial recipe:

  • One large jar of fruit (if fruit is large, cut into small chunks)
  • Enough alcohol to cover
  • About half as much sugar as alcohol
  • Add all ingredients together, cover tightly (airtight is best), and wait anywhere from 2 to 8 weeks, gently shaking the jar about once a week.
  • Strain the liquid and store in a glass jar or bottle.
  • The cordial often improves with age (3-6 months) - unless it contains citrus

This is really about it.  Honest.  There are many, many variations based on ingredient.  We can add spices or herbs, adjust times of steeping, mash the fruit first, freeze the fruit first, use a variety or mix of base alcohols... the possibilities are limited only by our imagination.

Some tips:

  • If the cordial is too sweet, we can add some watered alcohol to balance the sweetness.  This is just a 1:1 ratio of water to whatever alcohol we used to make the original cordial.
  • We are shooting for a 20-30% alcohol content (40-60 proof alcohol by U.S. standards).  If the cordial is too strong, we can add some sugar water (again about a 1:1 ratio) or some fruit juice.
  • Use perfectly ripe fruits - maximum sugar content will give maximum flavor.
  • If our cordial starts to become less sweet over time in storage, don't worry.  This is a natural process of the more complex white table sugar (composed of glucose and fructose) breaking down into its less sweet component parts.  We can fix this if you want by just adding a bit more sugar.
  • Honey can be substituted of the white table sugar.  We may need to use less since honey is sweeter.  However, honey (especially depending on the type) does have a unique flavor profile that we may or may not want in our final cordial.

A beautiful blackberry cordial.


Some one-ingredient cordials that I have seen (some I have tried) include:

  • Cherry
  • Blackberry
  • Raspberry
  • Black Currant
  • Red Currant
  • Rose Hip
  • Prune
  • Plum
  • Blueberry
  • Cranberry


Here are some combination-ingredient cordials:

  • Raspberry and Lemon
  • Gooseberry and Lemon Verbena
  • Rhubarb and Strawberry
  • Apple and Cinnamon with Cloves
  • Orange (fruit and peel), Lemon (fruit and peel), and Vanilla Bean
  • Banana, Pineapple, and Vanilla Bean
  • Coconut, Pineapple, and Vanilla Bean


Monday, October 17, 2011

Recipe and Permaculture Tip: One-Minute Bread

An ridiculously easy recipe for a great loaf of bread!

Here is the list of ingredients... yes, that is it.


A good friend of mine (Jake) sent me this link quite some time ago.  This is a simple bread to make, and it is really quite good.  It obviously takes more than just one minute to make the bread, but the active amount of time you are really doing anything with this bread is under ten minutes.

There really are only four ingredients.  I use one bread yeast pack which is the 1/4 teaspoon required.  You can add any number of spices if you want at the end.

I will use this recipe when I want something that is a bit more bread-like than my Beer Bread but less time and quantity than the Artisan Bread in Five Minutes a Day.  It is great served with a good quality cheese or sliced thin lengthwise and used for sandwiches.

It is so easy!

Permaculture Tip
This tip was told to me by Jake (who sent the link above) a few months after sending me the bread recipe.  

For all you homebrewers out there...  You know when you are done fermenting a batch of beer and you have that stuff left over on the bottom of the carboy?  The technical term is "trub" (it comes from the German word for lees).  Well, this sediment that remains is composed of heavy fats, proteins, and inactive yeasts.  Jake and his friend were sitting in the kitchen cleaning up after bottling a batch of beer.  Jake's friend says, "I bet you that stuff there would be great in bread."  He was right!

This was a brilliant "ah-ha!" moment.

Now, whenever I drain the beer off the trub, I always save it.  I try to use it later that night.  I will substitute one cup of water for one cup of trub in the recipe listed above.  Sometimes I'll use a little more.  I may need to add a bit more warm water to get the consistency of the dough right.  Just experiment and see what works.

We will end up with a richer, more complex-tasting bread that has an amazing flavor.  This is a implementation of Permaculture Principle Six: Produce No Waste.  What we have been throwing away, discarded as waste, is an amazing ingredient in bread adding nutrition and flavor.  What a great idea!

Thanks, Jake!


A Permaculture Tip is an idea that is derived from observing and interacting with nature.  It is simple.  It is safe.  It is effective.  It helps build a sustainable system of agriculture and life in general.  If you have any Permaculture Tips you would like to share, please let me know.  I will post it here, give you the credit, and post a link to your blog or website if you have one.  Email me here: kitsteiner@hotmail.com

Friday, May 27, 2011

Homebrewing Beer


Before we get to beer, let's talk about homebrewing in general first...

What is Homebrewing?
"Homebrewing is the brewing of beer, wine, cider and other beverages, both alcoholic and non-alcoholic, through fermentation on a small scale as a hobby for personal consumption, free distribution at social gatherings, amateur brewing competitions or other non-commercial reasons."
http://en.wikipedia.org/wiki/Homebrewing

Some quick definitions of alcoholic beverages:
Beer: Made from cereal grains, usually barley but also wheat, oat, corn, rye, etc.
Wine: Made from grapes.
Cider: Made from apples.
Perry: Made from pears.
Mead: Made from honey... a.k.a. Honey Wine
Cyzer: Made from honey and apples.
Pider: Made from apples and pears.
Pyment: Made from honey and grapes.
Melomel: Made from honey and other fruits.
Country Wine: Wine made from fruit other than grapes.
Why Homebrew?
  1. Price:  It is much cheaper to make your own.  At a minimum, it is 50% cheaper.
  2. Quality:  If I make it, I know what I put in it.
  3. Variety:  I can make things I cannot buy is stores.  I can even make my own varieties!
  4. Self-Sufficiency:  I like to know how to make things from “as scratch” as possible.
  5. Health:  Drinking alcohol, in moderation, is associated with many health benefits.
  6. It is FUN!
Basics of Brewing Beer
Note: This is a VERY basic overview.  If you are an experienced homebrewer, forgive the brevity and exclusion of some detail.

Ingredients:
Malt
Hops
Yeast
Sugar

Malt
This is germinated grain (usually barley) that has been allowed to dry in a process called “malting”.  If you raise your own grains, you can do this yourself.  If you don’t raise your own grains, then you can purchase malt.  It usually comes in either liquid or dry forms.  The liquid form is partially evaporated and sold in cans labeled Liquid Malt Extract.  The dry form is the same substance, but it is evaporated even further into a powdered form and sold as Dry Malt Extract.
Geminated Barley

Variety of dried ("malted") grains.
Hops
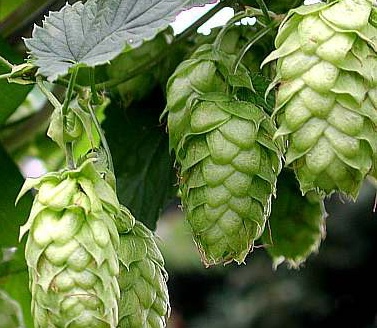
Hops is a flower from the Hops vine.  It is used to add bitterness and aroma to the beer.  Bitterness is required to counteract the overly sweet taste of fermented malt.  Hops really became associated with beer due to its preservative ability.  Traditionally, without hops, beer would go bad much faster.  Hops can be used fresh or dried.  The dried forms are sold as whole flowers, pellets, and plugs.

Hops on the vine.
Yeast
Yeast is used to convert the sugars from the malt to alcohol.  There are many varieties of yeast in the world, but the one most used in brewing is Saccharomyces cerevisiae, and there are hundreds of strains to choose from.  This is usually sold in liquid or dry powdered form.   Some people even culture their own strains.
Dried brewer's yeast.
Sugar
This is used after the beer has already undergone its primary fermentation.  Adding some sugar right before bottling or kegging allows the remaining yeast in the beer to create additional carbon dioxide under pressure… carbonation!  Many types of sugar can be used, but most common is corn sugar.
Basic Homebrewing Process for a simple Ale
  1. Malted barley is boiled in water.
  2. Hops is added.
  3. Allow the mixture to cool.
  4. Yeast is added (“pitched”).
  5. This concoction (wort) is allowed to ferment (typically for one to 3 weeks). You now have uncarbonated beer!
  6. Sugar is added.
  7. The beer is bottled or kegged.
  8. Wait another two weeks.
  9. Drink your beer!
Overall, homebrewing beer is a very simple process; however, there are thousands of variations to this simple process.  Which grains to use (barley, wheat, oats, rye, corn, etc).  How the grain is processed while malting (light, amber, dark, chocolate, etc.).  How long and how much  malt is boiled with the water.  When and how much and what type of hops is added.  What type of yeast is used.  How long and the temperature during fermentation.  What type of sugar is added.  What other ingredients are added (fruit, herbs, spices, etc).

With all these variables, there are literally thousands of beers you can make…  what are you waiting for?

Resource: This is my favorite book on homegrewing beer.